Getting Started with CFEngine
Today I want to tell you about new topic that is complementary to continuous integration. We will talk about configuration management in terms of TeamCity agents. Because configuration management itself is a very broad subject I’ll just concentrate on brief introduction to CFEngine, write down solution to some problems I’ve encountered and try to put a lot of references here and there. In this post we will only cover installation and basic configuration of CFEngine. I’ll probably write more on the subject next time.
What is Configuration Management?
Simply speaking, configuration management (CM) is a process (and a set of tools) that allows managing a large number of machines in a centralized fashion with proper versioning; fix configuration drift and maintain software consistency.
For example, taking TeamCity agents in mind, you may want to have a separate groups of agents with different NodeJS versions (0.8 and 0.10) and this task can be easily accomplished and maintained with CM tools.
See also:
- What is Configuration Management?
- Configuration management on Wikipedia
- Comparison of open-source configuration management software on Wikipedia
What is CFEngine?
CFEngine is a declarative, flexible, scalable, lightweight, blazing fast and incredibly powerful open source configuration management system. It implies relatively lowlevel system engineering and has a pretty steep learning curve. From my perspective it also has some troubles with documentation structure, details and quality.
If you need more simple and developer-oriented configuration management tool I encourage you to have a look at other popular CM systems like Puppet or Chef.
See also:
Installation
CFEngine is a distibuted system and generally all instances are equal. But there should be at least one host (called “policy hub”) that will be responsible for the distribution of policy files for other clients. Clients then bootstrap to the policy hub, load policies and start operating.
Initial installation of policy hub and clients is easy and explained here:
If you have problems when bootstrapping additional clients:
- Ensure that port
5308is open on both client and policy hub. - By default policy hub is very picky about who are his friends, so check the access control list in
def.cf(look forvars: ... "acl" slist => { ... }inbundle common def). For simplicity (or if you know that your environment is properly isolated) you can just allow access to policy hub from everywhere: add"0.0.0.0/0"to"acl"list variable.
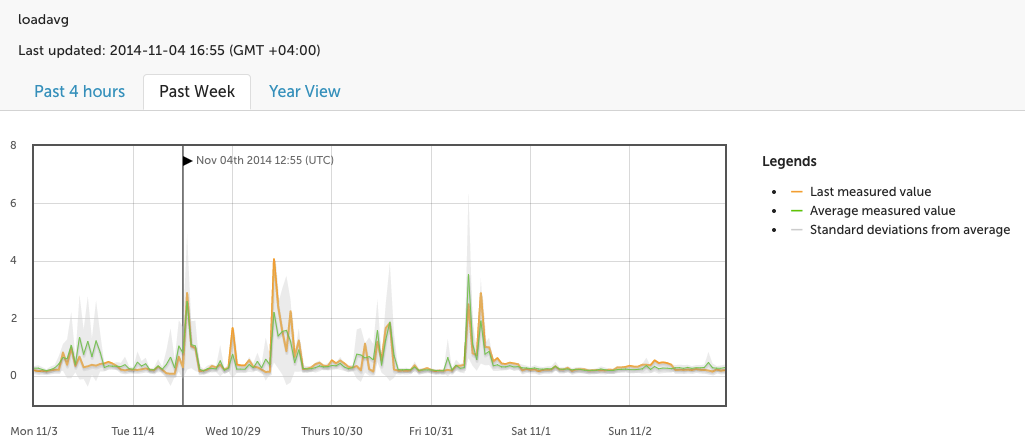
Enabling Monitoring
CFEngine Mission Portal provides an ability to monitor and plot any measurable values. Clients are gathering useful information right from the beginning, but Mission Portal will complain that it couldn’t collect any data.
The problem is that by default no data is reported back to policy hub. This is configured in controls/cf_serverd.cf:
report_data_select => default_data_select_host
where default_data_select_host body is defined in lib/3.6/reports.cf as
body report_data_select default_data_select_host
{
  metatags_include => { "inventory", "report" };
  metatags_exclude => { "noreport" };
  monitoring_include => { "" };
}
As you can see, monitoring does not include anything. For example you can put there "cpu" and "loadavg" or use .* to show everything that CFEngine could find for you.
Example Inventory Policy
We will write a very simple inventory policy that enable us to group TeamCity agents in Mission Portal. See also Custom Inventory Tutorial. In this example I show you how to group clients by their hostnames.
CFEngine policies is written in declarative DSL. See Language Concepts.
Every 5 minutes a daemon called cf-execd executes cf-agent on all clients. It will load and execute promise bundles from /var/cfengine/inputs/promises.cf which are distributed from policy hub master files. Master files is located under /var/cfengine/masterfiles on policy hub. Let us create a file inventory/teamcity-agent.cf there:
bundle common inventory_teamcity_agent
{
  classes:
    "teamcity_agent"
      or => { "agent01_example_com", "agent02_example_com", "192_168_1_34" },
      meta => { "report" };
}
- Global classes can be defined only in
commonbundles. - Our bundle has a meaningful and unique name matching directory structure.
- We define a simple global class that is set only on hosts with certain hostname-like classes. Those are automatically discovered hard classes. You may also use an IP-address-like class there too.
reportmeta tag is instructing CFEngine to send presence of this class back to policy hub so that we can use it in Mission Portal.
Check that policy syntax is correct: cf-promises -f /var/cfengine/masterfiles/inventory/teamcity-agent.cf.
Now we need to include our new policy into host main bundle called body common control in promises.cf:
body common control
{
  bundlesequence => {
    inventory_control,
    @(inventory.bundles),
    def,

    # add our new bundle after default inventory bundles
    inventory_teamcity_agent,

    # ...
  };

  inputs => {
    "def.cf",
    @(inventory.inputs),

    # include our inventory policy after default inventory inputs
    "inventory/teamcity-agent.cf",

    # ...
  };
}
You can now verify it running cf-promises --show-classes | grep teamcity_agent on agent host:
teamcity_agent source=promise,report
And now in Mission Portal you can define a new group of hosts using our fresh inventory class:
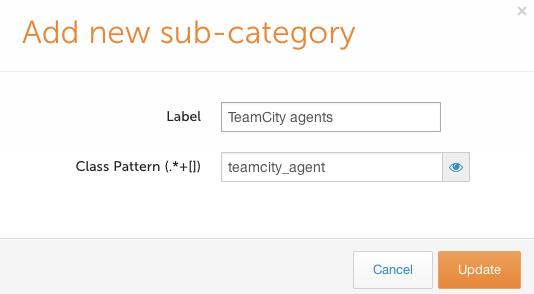
For more examples see Examples and Tutorials.
Have a nice day!